Image Map

Monday, July 25, 2016

Invest Now {Part 1: Teaching and Practicing Routines and Procedures}


If I could give any advice to new teachers it would be this....the first two weeks of school are critical...Invest NOW or you will pay later.  If you spend time these first two weeks really teaching and practicing your routines and procedures it will pay off for the rest of the year.  It takes time yes, you have to go sloooow yes, sometimes it means practicing how we line up several times yes....but trust me, if you take the time to do it now it will help your classroom run smoothly the rest of the year.  

Here are some things that I do to teach and practice our classroom routines and procedures with intention.

Every year, I make a book of all of our routines and procedures.  Years ago that meant typing them out, printing them, gluing them onto construction paper, coloring a cover and binding them.  Old school sytle at its best!  Now, thanks to cute clip art and power point...I have a much cuter version that is easy to edit!

One of the great things about making this binder is that it forces me to sit down and really think through how we do things in our classroom.  Over the years some of those things have changed, I've found what works best for me.  

And if we are being real...sometimes things change throughout the year because they just aren't working the way I thought they would.  When that happens, I can just go in, edit and reprint!  

I love this binder because it helps me stay on track during those first two weeks when I'm teaching the procedures and we are practicing them.  It's a great reference tool for students {I keep it front and center those first few weeks and easily accessible} and it's super easy to leave for a sub so they can see how your room runs!

I've made a completely editable version of my Routines and Procedures Binder if you'd like to make one of your own!  You can check it out HERE!  

Teaching your classroom routines and procedures is just the beginning.  It is so important to practice...practice...practice until they get them right.  So, what are some ways that we practice?

1.  Model!
I always model for my students exactly how the routine or procedure should be done.  Seeing the teacher model it is one thing, but it's so much more engaging when it's one of their own modeling it.  One of my students' favorites is when we play, "What NOT to do!"  I choose a student to model the incorrect way to do the routine or procedure.  I encourage the audience to be looking for all of the things they did incorrectly, and then we discuss what went wrong!  They absolutely love getting to act "naughty!"  I ALWAYS follow this up with a student modeling the correct way to do it, with a discussion about what they did well!

2.  Practice Whole Group
After the routine or procedure is modeled we then practice as a class.  If we are practicing how we line up, for example, we watch students model what not to do, what to do, discuss both and then practice lining up.  I always give specific feedback about what they did well and what we can work on for next time.  Some times our next time happens right away, I never let them end practice on a bad note! Since they are lined up I will usually then get something else out of the way, like talking a quick walk to show them where the closest restrooms are.  

3.  Have Students Review the Routine/Procedure
Throughout the day during the first two weeks or so of school, I will call on students to review the routine or procedure and tell us step by step how it's done.  Sometimes I have them review with a shoulder or eye ball partner at their tables first and then I ask them to share what they discussed with their partners.  If needed, I will have students model it again!

I use every free second I have during the first two weeks to review and practice how we do things in our room. It takes time.  And sometimes we have to do things more than once.  But,  it is without a doubt time well spent. 

I promise that if you take the time to invest NOW...at the beginning of the year it will pay off with a classroom that runs smoothly!

Saturday, July 23, 2016

Back to School 2016 Part 2: Making Students Feel Welcome


I am so excited to meet my new class this year!  Meet the Teacher is a great opportunity to ease some of their nerves and begin to establish your classroom culture.  Here are some things that I do to help students feel welcome at Meet the Teacher.


Being prepared for your students at Meet the Teacher looks a little different than being prepared for parents!  If you didn't read Part 1 in this series be sure to check it out HERE.

In part 1 I talked about a lot of the forms that I have ready for parents.  So, what are the students doing while their parents are filling out paperwork?  Well, if you aren't prepared Meet the Teacher can turn into a mess!  

I like to have my students look around the classroom, get comfortable and start locating things!  I do that by giving them a half sheet of paper with things to find in the room, once they find everything they can bring me their paper for a little treat!


If you'd like to make one for your class you can download an editable version HERE!

One of the steps on the Get to Know Our Classroom paper is to find the boxes and sort their supplies.  Many of our students bring their supplies from their supply list to Meet the Teacher so they don't have to carry them in themselves on the first day.  I have big plastic containers ready with labels for them to sort their community supplies into.  Supplies like glue sticks, pencils, paper, and black dry erase markers are considered community supplies.  All of the other supplies are kept at their desks.  This also saves me a lot of time on the first day of school!  I also make sure to have extra supply lists handy for those parents who need one!


Nothing quite says welcome like seeing your name on things and ready for you!  Students love to walk into the room and see that you have taken the time to use their name and label their things!  I do get name tags ready for them ahead of time, but I do not tape them down until after Meet the Teacher.  I will have to change at least 1 to 2 of them because a student goes by a nickname or uses their middle name instead of the first name, etc...  It is a little extra work, but it's worth it to me to have it ready for them!  
I use the editable skinny name tags by Learning in Wonderland so it's a pretty easy fix...just retype the name and print!


Another thing that I do that is always a big hit is my Welcome to 3rd Grade slideshow.  I make a slide for each student and have the slideshow playing on a loop for the entire Meet the Teacher.  Students love to see their name come up and it makes for a great photo op for parents!

It's a little hard to see in this picture but the slideshow is playing on my SmartBoard at the front of my room.


If you'd like to do a welcome slideshow of your own, I've made one that is editable and includes slides for Kindergarten through sixth grade. 

 Directions for how to make it are included.  You can check it out HERE!


In Part 1 of this series I talked about the photo booth that we use at Meet the Teacher.  


We put it in the hallway for all of third grade and encourage our students to take pictures with friends.  I also have a sign hanging by my door with my email address and I ask parents to email me the pictures they take of their students.  I save them in a file to be used in our end of the year slideshow!  

I hope that you have found some of these tips useful.  Helping students and parents feel welcome is such an important part of starting the year off right!  

Stay tuned for my next series of posts about investing time at the beginning of the year so that your class runs smoothly all year long!

Thursday, July 21, 2016

Back to School 2016 Part 1: Making Parents Feel Welcome


If your school is anything like mine you have a Meet the Teacher night right before the start of school.  This is a great opportunity for the students, their parents and even us teachers to meet and ease some of the anxiety of a new school year!  In this 2 part series I am going to share some things that I do to make students AND parents feel welcome. 

Parents can sometimes have just as much anxiety as their kiddos over the start of a new year.  Will the teacher “like” my child, will the classroom be warm and inviting, will the teacher make sure they get home the right way on the first day.  As a mom, I totally get these feelings.  These are their babies, the most precious things in the world, and they are trusting us to love on and care for them for an entire school year.  Meet the Teacher is a great opportunity to ease those nerves and start off on the right foot with parents!


Nothing says I am ready for your child like an organized classroom.  I like to make sure that everything is hung, clean, shelves are organized and I have ALL of my paperwork ready to go. 
This is what my room looked like last year just a few moments before Meet the Teacher started.

On each desk I have my class handbook ( I use the AMAZING flip book template by Learning in Wonderland).  I give this out at Meet the Teacher so parents have time to look through it and ask me any questions.  It also has our daily schedule as well as our specials schedule so students can be prepared for the first day (yes, we have specials on the first day of school!). 


Another anxiety that many parents have is dismissal time on the first day.  Third grade is the first year that students are on the “big kid side,” of our school building so that means that dismissal looks different for them.  This can cause some nervousness for everyone involved on day 1!  I like to have parents fill out a transportation form that lets me know their child’s normal transportation schedule and if that will look different on the first day of school.  You can grab the editable form FREE here.


I also leave a clothespin on the desk with the student’s name on it.  I have them hang the clothespin on the transportation chart.  This helps me make sure that the student also knows how they are going home on the first day of school.  Moving their clip on the chart becomes part of our morning routine in our classroom.  It helps me to make sure that each student knows how they are going home, helps anytime I get a phone call from the office, and if there is a change in their transportation during the day they have to physically get up and move it which helps them remember the change!This year I am using the adorable construction themed décor from The Creative Classroom so I made a transportation chart to match.  

Nothing makes people feel more welcome than having things personalized for them.  When parents see that you have taken the time to get things ready for their children it helps them feel at ease.  I like to have name tags on desks, but not taped down, just in case I have to make a change on them.  You know, like Charles goes by Matthew, not Charles!Another thing I like to have for each parent is a communication magnet.  I like parents to know right from the start that I am willing to talk with them, that this is a partnership between school and home and I am here to partner with them.  Parents feel welcomed and comfortable when they know that you have an open door and they can feel comfortable contacting you with questions. 


You can download my editable communication magnets  here

This is probably the most important of all…well maybe after being prepared!  Have fun with your new students.  Our grade level sets up a photo booth each year.  We use the photo booth from the sweet Moore to Learn.  You can check it out here!
Don’t be afraid to get in the pictures with your new students.  It helps everyone to feel at ease to know that the teacher is going to have fun with them this year!

I hope that you found some helpful tips and ideas and that your school year gets off to a great start!  Next up…Part 2: Making Students Feel Welcome!  

Tuesday, July 19, 2016

"I'm Done...Now What?"...Brain Boxes to the Rescue


Several years ago, tired of trying to find things for my early finishers (and as the teacher of the gifted cluster I have LOTS of early finishers!) I began using Brain Boxes. 

What are Brain Boxes?

Each numbered box contains an activity that is engaging, creative and sometimes challenging!  The activities are seasonal and review concepts in ELA and Math and challenge students to think creatively! When students complete an assignment they can grab a Brain Box from the bucket.  They record the number of the box on their recording sheet and then follow the directions on the activity card and record their thinking on the paper. 


How to make your Brain Boxes

 I purchased the bucket and the small containers at my local Dollar Tree.  The containers came in packs of 10 (which is perfect since there are 30 activities for each month).  So the total cost of the bucket and containers was $4 and change…can’t beat that!  I used my Silhouette machine and some vinyl to cut the “Brain Boxes,” label and all of the numbers.  You don’t need a fancy machine to set it all up though…my old set up that I made about 6 years ago had boxes that were numbered with different colored Sharpies and it worked just fine!  I printed a label for the bucket on my computer and used mod podge to adhere it to the bucket. 


So, are you ready to check out Brain Boxes and see what they’re all about?  You can try the August {Back to School} Brain boxes for FREE.  If you love them like my kiddos and I do you can grab the year long bundle HERE!


I hope that Brain Boxes can help you put an end to the “I’m Done…Now What?” struggle!

Sunday, April 3, 2016

Text Features Using Who Would Win

My class has a new obsession….they can’t get enough of Jerry Pallotta’s Who Would Win series!  I had seen the idea on Pinterest to use the books to work on opinion writing, so I bough a big pack of them using Scholastic Bonus Points.

 
We used this awesome pack by Teaching in Stripes to organize our thoughts.  I read aloud from Whale Vs. Giant Squid, stopping before the big fight scene at the end.  I wanted the kiddos to form their own opinions based on the facts presented in the book.  Then they had to choose if they were Team Whale or Team Squid.

I gave them time to meet with their “teams,” and compare notes and then we wrote our opinion pieces.  After everyone’s writing was complete, I finally read the battle scene and they found out who would win.  They absolutely LOVED it!

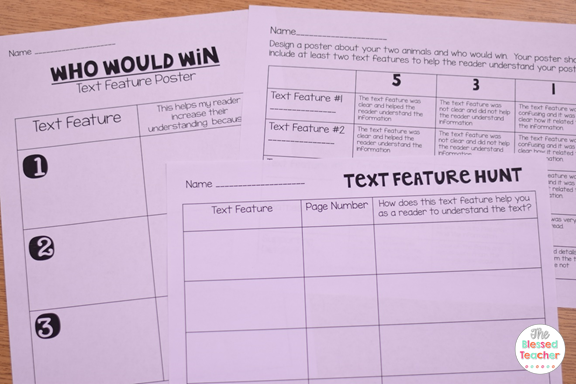
They were so in love with these books that I had to think of another way to use them.  So we did a review lesson on text features because these books are FULL of them!  I partnered them up and each set of partners got a different Who Would Win book.  They had to go on a text feature hunt and fill out a graphic organizer.


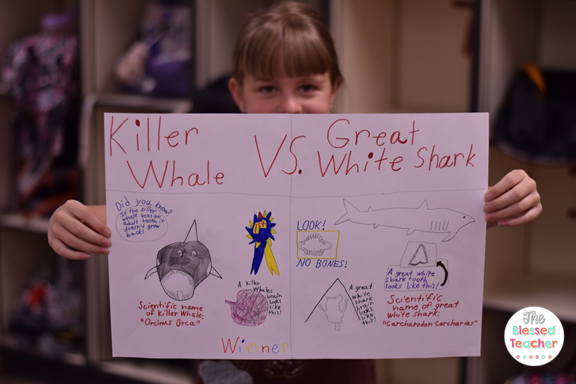
After that, they got to create a poster about their Who Would Win battle.  Their poster had to included three text features.  I think it’s safe to say that this project was a huge hit!  They had such a great time and it made my teacher heart so happy to hear them discussing which text features would help them explain the information on their posters!


Want to try it out with your class?  Click HERE to go grab the graphic organizers and poster rubric, they are a FREEBIE in my store!

Tuesday, January 26, 2016

Celebrating the 100th Day!

I love celebrating the 100th day of school with this fun little surprise activity!


Several days before the big day I take pictures of each of my students in the free Aging Booth app. I email each of the pictures to myself, save them, and upload them to Costco to get them printed. On the morning of the 100th day my students walk in to see the picture of themselves...with grey hair...and wrinkles!!!


We talk about what their lives may hold for them in the next 91 years before they will turn 100. We talk about what college they may attend, what career they may choose, awards they may win, will they get married? Have kids? Then they write a newspaper article to celebrate their 100th birthday!


We had such a great time laughing at the wrinkled faces and reading about the amazing things they are going to do in life! If you would like to try this with your class grab the editable newspaper template from my TpT store! (Click HERE to go grab it for FREE!) If you post pics be sure to tag me so I can check out all of your 100th day fun!

Monday, January 18, 2016

Where in the World is _______? {An Easy Sub Plan Assignment}

If you are anything like me, you hate planning for a sub.  In fact, you hate it so much that you would rather go to work under the weather than plan for a sub and take a sick day. 


“Where in the World is Mrs. Wood?”  is my absolute favorite writing assignment to leave on those days that I have no choice but to be out.  The kids love it and I can’t wait to get back to school to read their creative stories!  I will usually pick my favorites and share them during read aloud time!


Here are some of my favorites from last time I had to be gone…….


Slide1


These students obviously know me pretty well and I love how creative they were.


Student #1


had me on Broadway in New York because if I couldn’t be a teacher I would be an actress! (true story….my classroom is my stage!)


Student #2


thought that I’m not really a teacher, that is just my cover, I’m actually a secret agent and I was sent on a mission.


Student #3


had me hopping on a plane to the “urban jungles,” of brazil to get him a pet monkey.  This one cracked me up because I don’t think he understands what an urban jungle is and because all he talked about ALL YEAR was getting a pet monkey!!!


My hands down favorite one was


Student #4 


He said that I wasn’t at school because I was at a secret meeting of N.U.T.P.O.T  (Never Underestimate The Power Of Teachers)! 


Next time you have to be gone, do yourself a favor and leave this assignment!  Your kids will have a blast imagining where in the world you could be and you will be entertained when you get back to school and have to go through all of that work they did! 


The assignment is available in my TpT store and is editable so you can personalize it to your name!


Slide1


Where in the World Writing preview pic


If you use this product, I would love to see your favorites!  Take a pic for Instagram and tag me @theblessedteacher so I can see what your creative kiddos came up with!